Contenuti
Intro
One of the most interesting functions of modern technology is the ability to connect different devices by increasing interactions and the possibility of performing hybrid functions. For this reason, many people look for a way to connect their phone to the TV and thus be able to see the content on our phone on a much larger screen.
In the last two decades, there have been a lot of technological changes that have changed the way of life for many people around the world. One of the most visible and widespread changes is related to the use of cell phones, which have become smartphones with the passage of time and have greatly increased their functionality and potential, likening them to that of computers. To date, it is very rare to see a person who does not own a smartphone, and many activities from leisure to work are increasingly linked to this tool.
There are so many ways to connect the smartphone to a TV, and each of these methods is based on particular needs. In the following sections, we will find the different ways to connect the smartphone to the TV based on our particular needs. In addition, we will see when there is a need to use a wireless connection, and when a connection can be established through wireless or wired technologies, usually USB and HDMI.
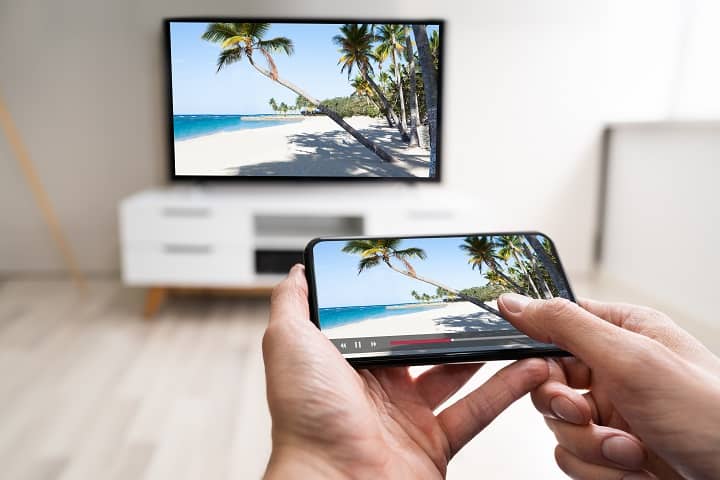
This article is a guide explaining how to connect the phone to the TV and transmit content such asgames, videos, photos, and applications from the phone’s display to that of the TV, which can be a smart TV or a traditional TV. In addition to seeing how screen mirroring works we will also take a look at the programs that allow us to use major streaming platforms, among which we find: Netflix, DAZN, Prime Video, Disney+, TIM Vision, etc.
Obviously, the solutions we are going to see are useful for connecting not only the phone with the TV but also other devices such as the tablet or PC, which we can still connect to the TV.
Methods for creating a connection between a smartphone and a TV
There are basically 2 types of connection between smartphone and TV, the wireless connection, which makes use of Wi-Fi, remote control or Bluetooth, and the wired connection. Much, of course, also depends on the type of TV we have (Smart or traditional without Wi-Fi) and the smartphone or tablet we need to connect (older models may in fact present greater problems).
Connecting a phone to a TV with Wi-Fi without using cables
First we will take a look at the most convenient option, which is the cable-free option, where with a few simple steps we can start mirroring from the phone to the TV. Mirroring refers to the ability to see what is happening on the smartphone directly on the TV display. The basic requirement for doing this without the use of cables is to have a Wi-Fi home network using a router, which allows us to connect several devices to the same network.
Let us now look at some methods and tools that help us develop this connection between devices.
Viewing your phone on your TV using Google Chromecast
One of the most widely used, convenient, and easy-to-use tools for mirroring with your smartphone and TV, whether Android or iOS, is an electronic tool from Google called Google Chromecast. This tool, connects to the HDMI port of the TV and requires a Wi-Fi or Ethernet connection, allows us to stream content from the smartphone to the TV.
This device takes advantage of Google Cast technology, which allows you to make the Mirroring from the screens of smartphones, tablets and PCs, as well as supporting platforms such as YouTube, Netflix, Prime Video, Now Tv, Localcast, DAZN, Infinity, etc. This type of technology is implemented baseline in some models of Smart TV, such as the Android TV, but it can also be used through the help of Chromecast. With its compatibility with Google Home, the Nest Audio, Hub and Mini platforms, and other devices that make use of the Google Assistant, it can be conveniently controlled with voice commands.
As for the price and features, this tool that plugs into the HDMI port is quite inexpensive for the potential it offers and is available in two versions: The basic version costs €39.99 and supports Full HD (1080p) as its maximum resolution, the version with Google TV, on the other hand, supports content up to 4K UHD resolution, costs €69.99, and has additional features that can make a regular TV Smart. Be careful, however, before buying a Chromecast, we need to check whether our TV is a Smart TV or not. In case ours is a Smart TV, it is possible that it has a Chromecast built in.
To connect a tablet or phone to the TV And send content to Chromecast from Android or iPhone, first we need to connect the Chromecast via HDMI to the TV, download the Google Home app, add the device, and follow the instructions that are provided, so that we connect our Google account and connect the Chromecast to the home WiFi network.
Once this is done, we need to verify that both the phone and the Chromecast are connected to the same wireless network. At this point, we can open one of the supported apps and tap on the broadcast icon, this icon has the image of a screen with the wireless network signal, once clicked, we have to select our Chromecast from the menu that appears and then start playback. To mirror the display from the smartphone to the TV instead, we just need to take the phone, go to Settings, choose Display and press on Transmit Screen or “Projection,” and follow the instructions.
Mirroring from smartphone to TV using Amazon Fire TV Stick
We see another tool very similar to the Google Chromecast, which, like the previous one, connects to the HDMI port of our TV. We are talking about Amazon’s Fire TV Stick, a tool that allows streaming of content from the phone display to the TV display. This is a very viable alternative to Google Chromecast, especially suitable for those who prefer to use Amazon’s systems and services. In addition, the built-in remote control with Alexa integration allows you to control your TV conveniently through voice commands.
This product is one of the most widely used and loved by consumers since, in addition to mirroring, it also allows streaming of various content, including some subscription services such as Prime Video and also free multimedia applications such as Youtube. Among the advantages of this device is the ability to access a dedicated media center that contains many games and multimedia applications.
In terms of types, it comes in 4 different versions: the standard version, the Lite version, the 4K version and the 4K Max version. For those looking for a product with the same features and additional functionality such as greater support for voice commands via Alexa, they may also consider the Fire TV Cube, a hybrid device that is a mix between the Amazon Fire TV Stick and the Amazon Echo.
As for price and features, let’s take a look at these different types of the product.
The Amazon Fire TV Stick in its basic version allows for a media player equipped with a Wi-fi receiving module that allows us to enjoy digital content from all the media applications available today and mirroring. This edition guarantees a maximum definition of 1080 p @ 60Hz (Full HD), has an included remote control that receives voice commands, and is priced at €39.99.
The Lite version performs the same functions as the standard version, and has the same maximum Full HD definition at 60 Hz. This version differs from its predecessor in two features fundamentally, the first is the remote control that does not have the TV on/off and volume buttons (while on the basic version they are found), and the second is the non-reception of “Dolby Atmos” audio signals, which results in slightly lower definition in very high quality sounds. In terms of price, this is the most affordable and you can take it home with only €29.99.
The Amazon Fire Stick 4K has the same functions as the previous versions, but its maximum definition is 4K UHD, with support for Dolby Vision, HDR and HDR10+, this makes the visual quality of images significantly better. This version mounts a 1.7 GHz quad-core processor with a 650 MHz GPU, making it more powerful and faster in operation. The 4K Max version is very similar to the latter but has a morepowerful processor, a 1.8 GHz quad-core with a 750 MHz GPU, making it even more powerful.
It is also compatible with the new Wi-Fi 6 and introduces the new Live View Picture-in-Picture feature. This function allows us to control connected cameras without interrupting our TV viewing, such as viewing the images transmitted by a video intercom when someone rings the doorbell at our house. The 4K version costs €59.99 while the 4K Max costs €64.99.
Now that we have taken a look at the different versions, let’s see what to do to connect the Amazon Fire TV Stick to the TV and then the phone to the TV.
Installation is really simple, if we did not choose the gift option during purchase and made the purchase on Amazon, the Fire Stick arrives already preconfigured with our Amazon account, and once we connect the stick to the TV, we only need to connect it to the home Wi-Fi network. If we did not make the purchase from Amazon or the device was given to us as a gift, the procedure is the same, but we have to log in to Amazon or register if we do not have an account.
Once this preliminary step is done, we connect the smartphone to the same Wi-Fi network as the Fire Stick and make sure the phone is no more than 9 meters away from the TV. That done, we put our hand on the smartphone and pull down the top drop down to see some options, select Projection and click on active (on some phones the name may be Cast, Screen Broadcast or Mirroring). If this option is not present, the smartphone is probably too old or we need to update its operating system. At this point, we go to the Fire Stick settings from our TV and select the Sound and Screen item, after which we select Enable Screen Duplication. From our Smartphone we select the Fire Stick that has become visible and the connection will begin, from now on, everything on the screen of our phone will also appear on the TV display.
Broadcast Android phone display on TV with Miracast technology
After looking at two devices that can help us in the task of connecting a TV with a device to perform mirroring, let’s look at a method that does not require any tool to be purchased to perform this task.
This cable-free technology is called Miracast and can only be used with phones or tablets running the Android operating system. Miracast takes advantage of the power of Wi-Fi Direct and is a technology promoted and supported by the Wi-Fi Alliance, so it allows us to view the phone’s display with a resolution from Full HD up to 4K UHD resolution with 5.1 surround sound.
To use this type of connection, both the smartphone and the TV must support Miracast technology. Usually, phones that have at least the Android 4.2 version as their operating system support this technology, but in any case, we can check compatibility with our smartphone, from the official Wi-Fi Alliance website. The TV, on the other hand, must be a Smart TV to support the connection, thus capable of autonomously connecting to home Wi-Fi. There is also the possibility that our Smart TV does not have support for the Miracast protocol, in which case, it can be remedied by purchasing a small adapter to plug into an HDMI port on the TV, which makes it capable of receiving this type of signal.
Now let’s see what we need to do to use this very convenient option. First, from our Smart TV, we need to find the Miracast app among the installed apps, if it is not present we need to download it from the TV app store or search for Miracast technology in the settings and activate it. The Miracast app may have different names depending on the TV manufacturer: For LG televisions it is often called Screen Share, for Sony Bravia it has the name Screen Mirroring, for Samsung it is often called Allshare, for Philips it has the name Wireless Screencast or Wireless Screen, etc.
As soon as we open and activate signal search, we pick up our smartphone and activate Miracast through a feature available in Settings called Wi-Fi Direct. Usually this option is found in Settings under Wi-Fi, where you have to select Additional or Advanced Settings and then Wi-Fi Direct. Once we are on Wi-Fi Direct, our smartphone will start looking for devices to connect to, let’s wait until our Smart TV is found and connect to it.
At this point, we have enabled the Miracast protocol, and we can directly broadcast the entire screen of the phone to the TV. In some smartphones to start mirroring we will have to go back to Settings, click on Connected Devices, then on Connection Preferences and finally on Broadcast, or go to the Display menu and select Broadcast, choosing the connected TV. When necessary, we must also press the button that appears on the TV screen to accept the will to start the transmission with the other device. With that done, we can finally enjoy mirroring.
Broadcasting our iPhone display on the TV with AirPlay technology
This is a very similar method to the previous one that does not require any tool to be purchased to accomplish this task. Airplay is a communication system from Apple, and is practically the alternative to Miracast from Android. AirPlay also works over Wi-Fi and allows us to send media content from iPhones, iPads, Macs and MacBooks to our TV. Clearly, this connection works only if both devices are connected to the same Wi-Fi network.
To know whether we can use this kind of technology, we must first have a Smart TV and an Apple device such as the iPhone. In addition, the Smart TV must support this technology, To verify that the TV is integrated with AirPlay technology, we need to look at the data sheet, packaging, or instruction manual and check for the Works with Apple AirPlay or Works with Apple AirPlay 2 label. Alternatively, we can check from the list of AirPlay-compatible televisions, directly from Apple’s official website.
If we find that our Smart TV does not support AirPlay natively, we can purchase a tool to plug into the HDMI of the TV called Apple TV. This device gives us the ability that allows us to make our television an AirPlay receiver, but also to be able to download and use applications downloaded from the App Store. This very useful tool is available in two versions: Apple TV HD, which supports streaming at maximum Full HD resolution, has 32 GB of internal storage and has a base cost of 159€, and Apple TV 4K, which goes up to 4K UHD, has 32 or 64 GB internal storage and starts at a base price of €199.
Let us now see how to use this technology for streaming and mirroring. Apple’s AirPlay has a very intuitive use, when our TV is turned on, to see a streaming app from our iPhone on the screen, we only need to open it and tap the Airplay icon by selecting the name of the TV in the devices that appear on the screen. Compatible apps include iMovie, GarageBand, Photos, Music, Amazon Prime Video, DAZN, Netflix, Spotify, YouTube, and many more.
To use true mirroring, first we need to take our iPhone and go to settings. Let’s go into Wi-Fi, activate it and connect to the home Internet line, after which we open the settings dropdown by swiping on the screen, select Duplicate Screen and choose our Smart TV in the list that appears. Clearly if the Smart TV is not connected to the same Wi-Fi network it will be impossible to find it. Once selected, a PIN of a few digits will appear on the TV screen that we will need to enter on our iPhone, and once entered, mirroring will begin.
Mirroring from smartphone to TV using DLNA
Let’s take a look at a somewhat dated technology, but one with a very high degree of compatibility, namely DLNA. The Digital Living Network Alliance (DLNA) is an international collaboration between computer industries and mobile device companies to create a common standard for local area network communication of audio and video devices. The DLNA standard is currently adopted by more than 250 technology companies, which is why compatibility is so high.
This type of protocol, we already find it integrated in virtually all modern Smart TVs, but it is also present in many consoles such as PlayStation 4, PlayStation 5, Xbox One, and Xbox Series X and S. To use it, we need the TV’s Smart functions, so we can create a DLNA broadcast from the smartphone. To do this, we will need to download, properly configure and use one of the applications made specifically for the purpose. such as iMediaShare, Localcast and BubblePNP.
These applications are often very intuitive and easy to use, and they will help us both stream from the smartphone to the TV, mirror, and even view media files on one of our servers.
Connecting a phone to a TV using cables
After looking at all the ways to connect your phone to your TV without using cables, let’s look at methods to start mirroring from your phone to your TV using cables. Mirroring refers to the ability to see what is happening on the smartphone directly on the TV display. The basic requirement to perform this operation is to have certain ports in the TV set where we will have to go to plug in the cables. In virtually all TVs it should be possible to use the methods we are going to list, but if the TV we want to connect is particularly old, it may be that some ports are not present.
In any case, there is a particular advantage to using a cable over a wireless connection. In fact, in wireless connections, there is often some latency, which causes images to arrive slightly later on the TV than what we see on the smartphone. With the cable connection, on the other hand, latency is practically zeroed out , which makes mirroring much smoother and in real time.
Let us now look at some methods and cables that will help us develop this connection between devices.
Making a connection from smartphone to TV using an HDMI cable
The easiest way to establish a cable connection between these two devices is to use an HDMI cable. With this type of connection, we can do mirroring, transfer media files to the TV, and engage in popular streaming apps.
The first thing to do before buying one is to check the USB and HDMI type ports of the two devices, that way we will know which two cable outputs we need. Usually, the latest smartphone models have a USB type C port, the somewhat older ones have a micro USB port, while iPhones and Apple devices, have a different type of port called Lightning.
If, we use an iPhone, in some cases we will need a Lightning to Apple digital AV adapter, as well as a decent quality HDMI cable to be able to make the connection. Long story short, Android devices need a USB-C/HDMI or Micro USB/HDMI cable, while Apple devices need a Lightning/HDMI cable. The maximum resolution that can be achieved by these cables is 4K Ultra HD at 60 Hz, and it obviously includes audio transmission.
We should be aware, however, that in some streaming services the transmission of content via cable is prevented, this is often related to copyright issues and encryption of data in transit.
Let us now look at the simple process to follow for mirroring. The first thing to do, of course, is to get the cable with the ports we need to connect the two devices. Once we have it, we need to connect the USB-C or micro USB or Lighting port to our smartphone and the HDMI part in the back of our TV. That done, we need to change sources on the TV and select the one named HDMI, with the number of the port we have connected. Once this is done we will see everything that appears on the phone screen on our television with almost no latency.
Make a connection from smartphone to TV using a SlimPort cable or similar
In some cases, depending on the TV and smartphone models we have, we will not be able to use an HDMI cable and will need an alternative cable; the SlimPort cable, in these situations, may be the one that will save the day. Even with this type of cable we will be able to mirror, transfer media files to the TV, and engage in popular streaming apps.
The special feature of the SlimPort cable is mainly about better compatibility, this allows us to connect both displays that have HDMI ports, but also those that have DVI, DisplayPort and VGA ports. Again, the maximum resolution achievable will be 4K Ultra HD at 60 Hz, with audio transmission as well, of course.
Similarly to the other cables, before buying it, we need to check the compatibility of both the smartphone and the TV with this technology, and check for the adapters we need so as to avoid an unnecessary purchase. In case we are sure of the support, we can then proceed to purchase this adapter.
To mirror, we need to connect the SlimPort cable with the dedicated port on our smartphone and the HDMI, DVU, DisplayPort or VGA part in the back of our TV. Having done that, we need to change the source on the TV and select it according to the port on the TV we are using, with the number of the port we have connected. Once this is done we will see everything that appears on the screen of the phone in our television with excellent fluidity.
Making a connection from smartphone to TV using an MHL cable
In addition to the cables we have just seen, we find A third alternative that may be useful in some situations, we are talking about the MHL cables. This acronym is more than just a cable; MHL technology was born in 2009, created by Silicon Image to enable portable devices, such as smartphones, to also transmit audiovisual signal, employing a cable usually of the micro USB/HDMI type.
This standard is used by a great many mobile device manufacturers, although as we know the most common port at the moment is USB type C. The most interesting thing about the MHL cable is its maximum resolution, which even goes up to 8K, with the special cable called SuperMHL. In addition, the transmission of the audiovisual signal is encrypted and supports HDCP, which serves to prevent certain types of piracy phenomena.
One important thing to keep in mind if we are interested in this solution is the fact that there are two types of MHL cable connections, active and passive. An active MHL link requires an external power source, which is not needed in passive MHL links. Passive connection can only be used in case this technology is supported by both our TV and the phone we want to connect, so it is a good idea to check if the HDMI port on our TV is labeled MHL and if it is supported in the technical specifications of the smartphone. On the official MHL website, we can find a useful list of devices that support this type of protocol.
Before buying an MHL cable, we need to be sure of the ports required by the devices we need to connect, partly because there are many types of these cables. In addition to the distinction between active and passive connections that we have seen, there is also a distinction between 5-pin and 11-pin micro USB/HDMI cables, which are different both physically and in terms of functionality.
Let us now look at the simple process to follow for mirroring. The first thing to do, of course, is to get the cable with the ports we need to connect the two devices. Once we have it, we need to connect the 5- or 11-pin micro USB port to our smartphone and the HDMI part in the back of our TV. That done, we need to change sources on the TV and select the one named HDMI, with the number of the port we have connected. Once this is done we will see everything that appears on the phone screen on our television with almost no latency and very high resolution.
Other functions related to the connection between smartphone and TV
After looking at a number of methods to connect these two devices in order to use streaming apps or proceed to mirroring, let’s look at some different functions that we can take advantage of with the connection.
In addition to what we have already seen we can do much more by developing a connection between a phone and a TV, in this section we will look at how to use desktop mode, transfer and view files, play smartphone music using TV speakers, and use the phone as if it were a remote control.
Use Desktop mode and view files from smartphone to TV
Desktop mode is a feature that allows us to use a smartphone on the TV as if it were a real PC and is very useful in case we want to view any kind of files on our TV. Enabling it is very simple but not all smartphones support it and there are some prerequisites to use this feature. Smartphones that support this mode include some of Huawei’s latest models.
As first, we must have a fairly recent smartphone, usually running Android, and our TV must be a Smart TV, thus capable of autonomously connecting to home Wi-Fi. To make use of Desktop mode we need to connect both devices to the same Wi-Fi network and create an appropriate cable-free connection.
To create this type of connection, we need to take the smartphone, open the settings and select “Other Connections” or “Connect and Share.” When we get to this menu, we need to turn on “Easy Projection,” sometimes also called simply “Projection” and activate it, choosing our Smart TV from the list of available devices. At this point, an alert should pop up asking us to use Desktop mode; in some devices we have to look for it in the settings dropdown instead (the one that opens by swiping on the screen).
Once Desktop mode is started, the TV screen will become very similar to a computer desktop and will contain some applications and programs typical of a PC. In some cases we will even be able to connect a mouse and keyboard to use the TV as if it were a real computer. Usually, however, the ability to use the smartphone screen as if it were a touchpad is provided, and then by moving the finger over it we will move the mouse and be able to use the desktop.
In the desktop we will also find some apps that are in our smartphone and we can use them. Using the Photos app we will be able to view our media files, using File Manager we will be able to find all the files in the phone, using a web browser app we will also be able to browse the Internet.
Play smartphone music with TV sound system
Not everyone knows that virtually every Smart TV on the market is equipped with Bluetooth connectivity. This type of signal allows us to connect our phone and use the TV to broadcast music in our home or even outside using Bluetooth speakers and soundbars.
In fact, modern Smart TVs normally take advantage of this technology for audio output by sending audio streams to speakers, headphones, soundbars and other devices. As for audio input streams, however, not all TVs are capable of receiving them from external devices other than input devices. In any case, even when the TV we own does not support this feature, almost certainly the reception of content is limited to sound content, while it is more difficult to transfer other types of files such as videos images and other types of data to the TV (to do these things just take a look at the previous paragraph).
So let’s see how to connect the phone to the TV with Bluetooth for audio transmission. To begin with, we need to enable Bluetooth on both devices; to do this, just go to settings. On most newer Smart TVs, however, Bluetooth mode is automatically activated the moment the media-sharing application is started. Depending on the model of the TV, you may then need to enable Bluetooth from the settings menu or not.
What we will need to do is to use the phone to connect via Bluetooth to the Smart TV; to do this, once Bluetooth is activated on the Smartphone, we need to pair it with the TV, which we will find among the available devices. Once this is done, a notice usually appears on the TV asking us to enable audio content sharing, and we will have to accept it. At this point sharing will be active, so any audio content that passes from the smartphone will be broadcast from the TV sound system. We will, for example, be able to play music from Spotify, Youtube, Amazon Music and the like, but also hear audio from social media videos or voice messages.
How to use your phone as a TV remote control
Another very useful feature allows us to use the smartphone as if it were a remote control, so we can use it to give commands to our TV. This option proves especially useful in case we have misplaced the remote control or do not feel like getting up to get it. To use the smartphone in this way both it and the Smart TV must be connected to the same Wi-Fi or Ethernet network.
To accomplish this task, there are many applications that can turn the smartphone into a TV control device, and they are often already installed in smartphones of the latest generations.
One of the most widely used applications is SmartThings, available for free for Android in the Play Store and App Store. Alternatives include LG ThinQ that works with LG Smart TVs, TV Remote for Sony that works on Sonys, MI Remote for Xiaomi, etc.
However, there are also apps that can be downloaded from the Play Store and App Store that work on virtually any Smart TV, such as Universal Remote Control, Yatse, and Broadlink. These apps are very simple to use and once connected to the TV make the phone screen a very easy-to-use and intuitive remote control.
